Error Code C=47 in QuickBooks Desktop
Summary: This write-up will help you learn how to fix Error code c=47 in QuickBooks Desktop. It discusses the error code, different occurrences, causes, and solutions. Besides, it also explains the QBW file repair tool to repair the corrupted QuickBooks QBW file and its components.
When using QuickBooks, you may come across different errors that hamper the work. The QuickBooks message code c=47 is one of them, which often occurs when posting payments, emailing a payment receipt, changing transaction records, or deleting bill payments in QuickBooks. Before proceeding to the troubleshooting guide, let's understand the error code c=47 and its major causes.
What Is Error Code C=47 in QuickBooks Desktop?
The QuickBooks Desktop error code C=47 indicates the system cannot find the transactions you are posting while running a report or opening the QuickBooks company file (.qbw). This error may trigger on screen for several reasons like a corrupted QuickBooks Company file, incorrect Internet settings, transaction log file stored in a damaged file folder, etc. You can resolve this error by restarting QuickBooks. However, in some cases, restarting QuickBooks may not work and you may need to implement manual troubleshooting methods or use a Rebuild Data utility software. The error code C=47 looks like below:

Causes of QuickBooks Error Code C=47
Some factors due to which QuickBooks error code C=47 occurs are:
- Corrupted QuickBooks Company file
- Incorrect Trusted sites settings in Internet Explorer
- Malware or virus attack
- The folder storing the transaction log file is corrupted
- The QuickBooks Desktop is not updated
How to Fix Error Code=47 in QuickBooks Desktop?
Below are various methods for rectifying the QuickBooks Desktop‘s error code=47:
Method 1- Modify the Internet Connection Settings in QuickBooks:
In many cases, the Internet Explorer settings may prevent you from performing modifications in the QuickBooks payroll. For instance, for updating records or performing any payroll-related operations. So here are the steps to configure the Internet Explorer settings in QuickBooks Desktop:
- Open the QuickBooks Desktop.
- Click the Help menu, choose Internet Connection Setup.
- Choose the “Use my computer’s internet connection settings” tab.
- Click the Next
- Now choose the “Advanced Connection Settings” tab.
- The Internet option Window is displayed.
- In the Internet Options window, click Update Trusted Sites Settings.
- Click the Security
- Choose the Trusted Sites zone.
- Click Custom Level below Security level for this zone
- Click Reset custom settings
- Choose “Reset to” drop-down button, click
- Choose Reset.
- Click the Yes button to confirm.
- Click OK.
Method 2- Update QuickBooks Desktop Application
Many QuickBooks errors appear if you have not downloaded the latest updates of the QuickBooks Desktop. So ensure that your QuickBooks application is up-to-date. To check if you have the latest QuickBooks release, then follow the steps:
- Open your QuickBooks Desktop.
- Open the Product information window by pressing the F2 Key.
- In the Product information window, you can check the current version and release of QuickBooks you have installed on the system.
If you find your QuickBooks is not updated, then download the advanced version using the below steps:
- First, close QuickBooks and the company files.
- Click the Windows Start
- Enter QuickBooks Desktop.
- Now right-click on the QuickBooks Desktop icon, and choose the Run as administrator
- The No company open window gets displayed on the screen.
- Click Help menu > QuickBooks Desktop.
- Choose Options
- Click Mark All tab, choose the Save
- Click the Update now option and click the Reset Update
- Once you are done with this, click Get Updates.
- Wait for a few minutes till the update is downloaded.
- Close and re-open the QuickBooks desktop and click the Yes tab to install the updates.
- After QuickBooks Desktop updates installation, restart the system.
Method 3-Re-Sort the Lists
The QuickBooks Error code c=47 can be fixed by re-sorting the list in QuickBooks Desktop. It changes the lists to their default order, resolving several QuickBooks errors. Here are the steps to re-sort the list:
Note: If you have enabled multi-user mode in QuickBooks, switch to Single-user mode before re-sorting the list in QuickBooks.
- Open the QuickBooks Desktop.
- Go to the Lists menu.
- Choose the list you need to re-sort.
- Click on Include Inactive checkbox.
- Select the View menu, then choose Re-sort lists.
- Click OK.
- Close the QuickBooks and reopen the Company file.
Method 4- Run the Rebuilt Data tool in QuickBooks:
The Rebuilt data tool is a QuickBooks built-in tool that helps fix minor company file errors. Using QuickBooks "Verify" and "Rebuild" options in the tool helps identify the data errors in a company file. In addition, it fixes the general discrepancies in reports, missing transaction errors, or corrupted company file issues. Below are the steps to use "Verify Data" and "Rebuild data" features in QuickBooks Desktop:
Step 1- Run Rebuilt data in QuickBooks:
- Go to the File > Utilities.
- Choose Rebuild Data tab as shown in below fig:
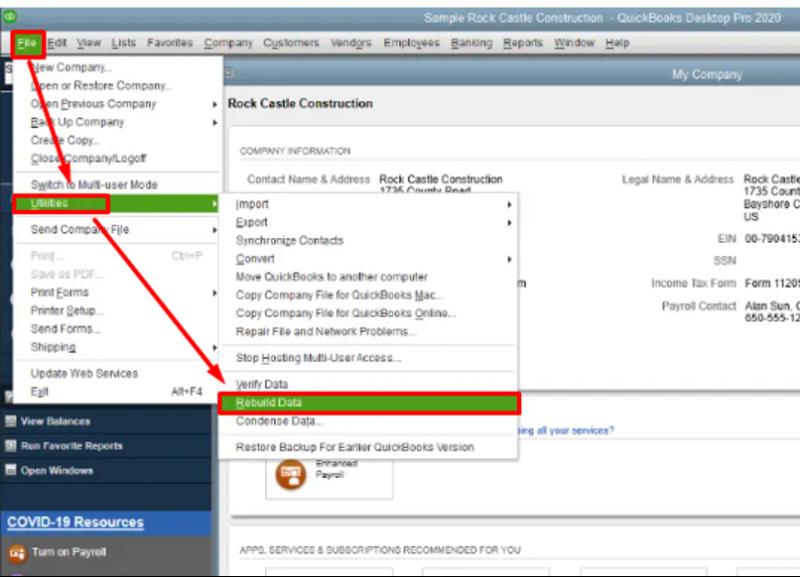
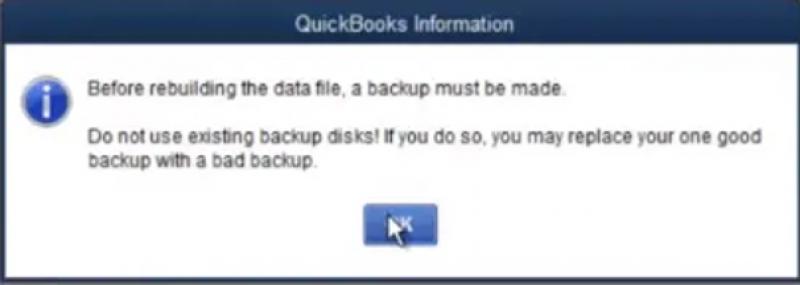
- In the Rebuilt Data dialog box, click

The QuickBooks information wizard will prompt on the screen asking you to backup company file. Click OK.
- You will see a dialog box on the screen saying, “Rebuild has completed.”

Step 2- Run Verify option:
After the damaged data is repaired using the Rebuild data tool, run the verify tool with the below steps:
- Go to the File
- Choose Utilities.
- Click Verify Data.
- If QuickBooks does not diagnose any error with rebuild data, click the OK button to use the company file.
- If the Verify option detects data issues, the window displays three options:
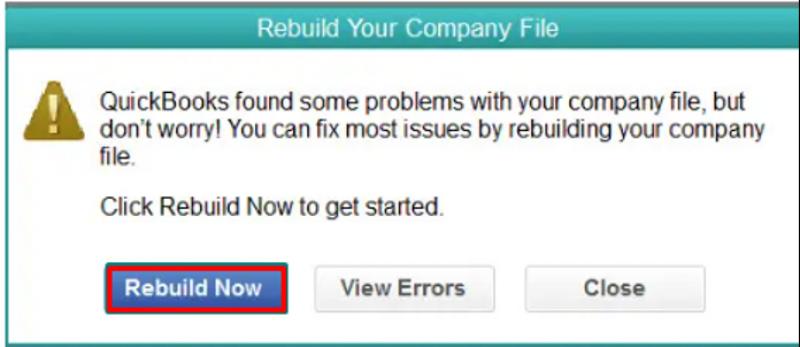
- Click Rebuild Now tab to get started.
Method 5- Use Stellar Repair for QuickBooks:
If the QuickBooks rebuild Data tool failed to resolve data damage within a company file, try Stellar Repair for QuickBooks® Software. It is an advanced tool recommended by ProAdvisors to repair corrupted QBW files. This utility supports all editions of QuickBooks and allows file recovery from QBB (QuickBooks® backup file). Also, it helps fix other components damaged by the QuickBooks QBW file. Follow the steps to use Stellar Repair for QuickBooks:
- First, download, install, and run Stellar Repair forQuickBooks® Software.
- Click the Browse tab on the interface window to choose the corrupted company file you need to repair.
- Click Scan.
- You will see the scan progress in the scanning window.
- Click OK.
- The tool can let you preview all the recoverable QBW file components. Including Employees, vendors, customers, and the company.
- Click Save to save the repaired file.
- A Save File dialog box will appear with the below two options: New Company File (QBW) and QuickBooks backup file (QBB)
- Choose a suitable option.
- Click the Save option to repair the QuickBooks file that you have chosen.
- Once the repair is complete, it will display a message “‘Repair process completed successfully.”
- Click OK.
Conclusion:
The above write-up discussed common reasons behind QuickBooks Desktop error code C=47. This error usually occurs when trying to delete the transactions or other causes explained above. Try resolving the issue using the resolutions explained in the post.
More to Read:


Previous Posts: